LOGIN FLEET OVERVIEW LEFT SIDE PANELS TOP PANELS MOBILE APPs

Edit object

1. Go to       Settings menu located in top panel.

2. In Objects tab choose object to edit and click      edit object icon on the right side.

3. Or go to      quick access and select               Edit object.

4. Edit object window will appear.

   Name - object name.

   IMEI - GPS device IMEI number.

   Transport model - for example: BMW 750.

   VIN - vehicle VIN number.

   Plate number - vehicle plate number.

   Group - assign object to a predefined group.

   Driver

No driver - disable feature.

Auto assign - should be selected if driver change detection is configured with RFID/iButton sensor. With auto assign, system will automatically detect driver according to RFID/iButton parameters.

Driver name - predefined driver name.

   Trailer

No trailer - disable feature.

Auto assign - should be selected if trailer change detection is configured with RFID/iButton sensor. With auto assign, system will automatically detect trailer according to RFID/iButton parameters.

   Trailer name - predefined trailer name.

   GPS device - allows to write device model (not mandatory).

   SIM card number - enter SIM card number.

   Odometer (km) - you can set how many kilometres vehicle drove.

   Off

GPS - calculates distance using GPS location points. It is not a precise tool, results of vehicle odometer and system may vary.

Sensor - system will get data from device sensor.

   Engine hours (h) - you can set how many hours engine worked.

   Off

   ACC - calculates engine hours using Ingnition sensor. It is not a precise tool, results of vehicle engine hours and system may vary.

   Sensor - system will get data from device sensor.

Icon

Click on Icon and select preferred from Icons library

Fuel consumption

Note: system fuel consumption statistics may vary from real fuel consumption of your vehicle. In order to receive fuel consumption statistics in your reports you need to set fuel consumption parameters.
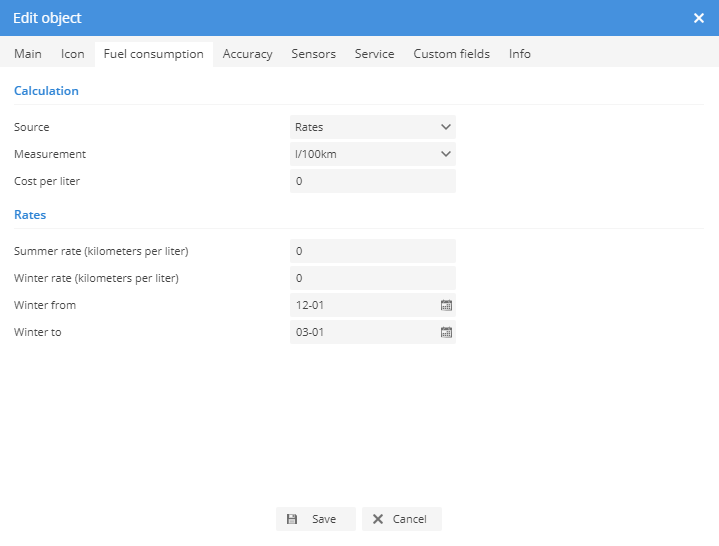
Calculation

Source

Rates - calculation will be made according to rates below.

Fuel level - calculation will be made according to set fuel level sensor.

Fuel consumption - calculation will be made according to set fuel consumption sensor.

Measurement - choose units.

Cost per liter - enter liter/gallon cost, currency can be set in user interface section.

Rates

Summer rate (kilometers per liter) - enter amount of kilometers which car can travel using one liter during summer period.

Winter rate (kilometers per liter) - enter amount of kilometers which car can travel using one liter during winter period.

Winter from - the beginning of winter period.

Winter to - the end of the winter period.

Accuracy

Time zone offset - by default it should be set to (UTC 0:00), adjust only in case it is not possible to set (UTC 0:00) time zone on GPS device side.

Detect stops using:

GPS - calculates stops using GPS location points.

ACC - calculates stops according to ignition sensor state, ignition sensor must be set up properly. Learn more about sensor parameters.

GPS + ACC - stops are being calculated according to both options.

Min. moving speed in km/h - set minimum movement speed. Very important to set proper value if object is moving slowly (example: walking).

Min. engine idle speed in km/h - minimum idle speed, below which idle status will be detected.

Min. difference between track points - this option helps to eliminate inaccurate GPS device location points (drifting).

Min. gpslev value - location point filtering according to GPS signal strength.

Max hdop value - location point filtering according to horizontal dilution of precision.

Min. fuel difference to detect fuel fillings (default 10 %) - allows to set minimum amount (in percents) when sensor data changes will be recognized as fuel filling. (Example: if fuel level rises by 10% or more, it will be recognized as fuel filling). Note: In order to use this option, you must configure fuel sensor properly.

Min. fuel difference to detect fuel thefts (default 10 %) - allows to set minimum amount (in percents) when sensor data changes will be recognized as fuel theft. (Example: if fuel level drops by 10% or more, it will be recognized as fuel theft). Note: In order to use this option, you must configure fuel sensor properly.

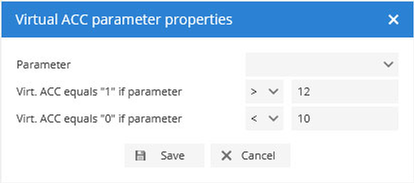
Enable virtual ACC parameter depending on voltage (parameter "accvirt")- allows to configure ignition sensor based on voltage parameters.

Sensors

Sensors section allows to add GPS device sensors and assign them to objects. There are many types of sensors which can be widely used. When configuring sensor, the choice of sensor type depends on device model and its principle of operation. For more details refer to GPS device user manual.

To process multiple entries do next:

Mark entries by clicking checkbox on the left.

Proceed action in     action menu located at the bottom of settings window.

Choose option     Import,     Export or     Delete.

Confirm action which will be applied to all selected entries.

To add sensors do next:

Go to     Settings menu located in top panel,

Choose object and click on    edit object button.

In Edit object window go to Sensors tab.

In left bottom corner press     button.

Sensor properties window will appear.

Sensor

Name - sensor name.

Type - sensor type that is suitable for the specific task. Note: for correct sensor type refer to GPS device user manual.

Digital input - displays device sensor value 1 or 0 (enables input fields to enter sensor state text).

Digital output - displays device sensor value 1 or 0 (enables input fields to enter sensor state text).

Driver assign - this sensor type allows to receive string from RFID or iButton devices. Received string will be checked in system. As a result, information will be seen, which driver is using vehicle. Note: Auto assign must be set in object settings.

Engine hours - receives engine hours value.

Fuel level - this option requires to specify result type (value or percentage) depending on device information result. For more details refer to GPS device user manual.

Fuel consumption - receives total fuel consumption or consumption between two points.

Ignition (ACC) - displays device sensor value 1 or 0 (enables input fields to enter sensor state text).

Odometer - receives total odometer or odometer between two points.

Passenger assign - this sensor type allows to receive string from RFID or iButton devices. Received string will be checked in system. As a result, information will be seen, which passenger is using vehicle. Note: Auto assign must be set in object settings.

Temperature - receives temperature value.

Trailer assign - this sensor type allows to receive string from RFID or iButton devices. Received string will be checked in system. As a result, information will be seen, which trailer is connected to vehicle. Note: Auto assign must be set in object settings.

Custom - allows to enter any necessary sensor information. For more details refer to GPS device user manual.

Parameter - sensor parameter, refer to sensor parameters section for more details.

Data list - sensor will be shown in popups on map.

Popup - sensor will be shown in object details panel.

Result

Type - option depends on chosen sensor type.

Logic - allows to enter text depending on sensor value.

Value - this option requires to specify result units of measurement (for example: kg, liters...) and formula (if applicable).

Percentage - this option requires to specify result lowest and highest values.

Absolute - total value.

Relative - value between location points.

Units of measurement - value depending on sensor type (example: liters, gallons, volts...)

If sensor "1" (text) - allows to show custom text if result value is 1 (example: if sensor is used to monitor engine state, than if engine is running, text could be ON).

If sensor "0" (text) - allows to show custom text if result value is 0 (example: if sensor is used to monitor engine state, than if engine is not running, text could be OFF).

Formula - in some cases need to perform device result calculations to get precise value. Note: for more details refer to your GPS device user manual. In formula field you can multiply, divide, add, subtract, use brackets. X means value which was sent by device.

Depending on sensor and result type parameters you will be able to enter lowest and highest values. This option allows to configure value range. Example: if need to monitor vehicle fuel level and GPS device is sending volts instead of real capacity, we need to know voltage of empty and full fuel tank (example: empty tank: 3 volts, full tank: 10 volts, according to these values: lowest value: 3, highest value: 10).

Lowest value - lowest sensor value.

Highest value - highest sensor value.

Ignore if ignition is off - in some cases this solves fuel level drops when vehicle is not running.

Sensor result preview

Final sensor value preview.

Calibration

This section can be used with Fuel level, Temperature and Custom sensor type. Calibration allows you to set precise parameters of the sensor. Widely used to calculate fuel tank readings or convert sensor voltage to temperature values.

Example 1: Fuel tank

Different places Inside of the fuel tank may be wider or narrower and to get more accurate data you should use calibration.

In order to perform a more precise measurement of fuel tank, it is necessary to measure fuel tank sensor voltage width different fuel level. The system allows you to set up to 50 points, the more points you specify, the more accurate readings you will get.

Directions: Drain the fuel tank, write down the fuel sensor voltage readings, fill the tank with 5 liters/gallons of fuel, make a note of the fuel sensor voltage readings and so on until the tank is full.

Program will calculate fuel amount according to fuel sensor values.

Example of fuel sensor results:

Empty tank - 2 volts

5 liters tank - 3 volts

10 liters - 4 volts

15 liters - 5 volts

...

60 liters - 14 volts

Follow these steps to enter data correctly:

Choose sensor type: Fuel level

Choose result type: Value

Enter units of measurement: liters or gallons

In calibration X field: 2

In calibration Y field: 0

Click add button

In calibration X field: 3

In calibration Y field: 5

Click add button

In calibration X field: 4

In calibration Y field: 10

Click add button

...

Save sensor

Example 2: Temperature sensor

If temperature sensor sends volts instead of temperature values, then it is possible to convert results.


In this case we need to know temperature sensor voltage at its lowest and highest states.

-40 degrees - 3 volts

40 degrees - 7 volts

Program will calculate exact temperature according to set values.


Follow these steps to enter data correctly:

Choose sensor type: Temperature or Custom

Choose result type: Value

Enter units of measurement: (according to example, you should use degrees)

In calibration X field: 3

In calibration Y field: -40

Click add button

In calibration X field: 7

In calibration Y field: 40

Click add button

Save sensor

Dictionary

Dictionary allows to assign text to particular parameter value. Text will be visible in object details panel and popup which appears on map.

Service

Service allows to set a reminder about vehicle maintenance work (example: change engine oil, insurance expiration)

To process multiple entries do next:


Mark entries by clicking checkbox on the left.

Proceed action in     action menu located at the bottom of settings window.

Choose option     Import,     Export or    Delete.

Confirm action which will be applied to all selected entries.

To add reminder entries do next:


Go to      Settings menu located in top panel,

Select object and click on      edit object button.

In Edit object window click Service tab.

In left bottom corner press      button.

Service properties window will appear.

Service

Name - service name (example: Change engine oil).

Calculations are made according to odometer results:

Odometer interval (km) - distance after which service must be applied.

Last service (km) - enter distance when the last time service was done.

Calculations are made according to engine run time:

Engine hours (h) - time interval after which service must be applied.

Last service (h) - enter the last time service was done.

Calculations are made according to days:

Days interval - number of days after which service must be applied.

Last service - choose last service date.

Trigger event

Odometer left (km) - event will be triggered if chosen distance reached, option available only if Odometer interval (km) is checked.

Engine hours left (h) - event will be triggered if chosen time reached, option available only if Engine hours interval (h) is checked.

Days left - event will be triggered if specified days reached, option available only if Days interval is checked.

Update last service - automatically updates information.

Current object counters

Current odometer (km) - current odometer results.

Current engine hours (h) - current engine hours results.

Custom fileds

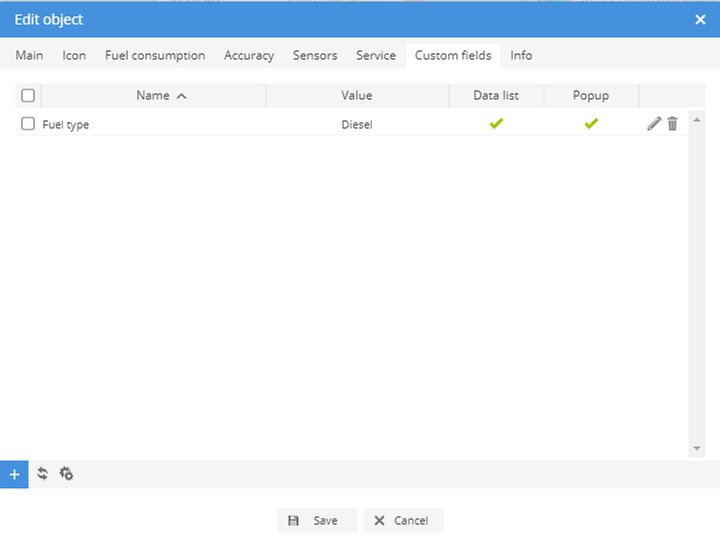
Additional information can be added to object

Custom field data can be seen in object details popup. Click object cursor (icon) located on map.

Edit object

Depends on user privileges

Info

More details about object, coordinates, speed, time and device protocol information.

Back to top

Other quick access options described in Quick Access…